Clips
In OpenShot, when you add project files (videos, images, and audio) to the timeline, they appear as clips represented by rounded rectangles. These clips come with different properties that influence how they’re rendered and composited. These properties include the clip’s position, layer, scale, location, rotation, alpha, and composite (blend mode).
You can examine a clip’s properties by either right-clicking and selecting Properties or by double-clicking the clip. The properties are listed alphabetically in the Property dock, and you can use the filter options at the top to find specific properties. See Clip Properties for a list of all clip properties.
To make adjustments to a property:
For rough changes, you can drag the slider.
For precise adjustments, double-click the property to enter exact values.
If the property involves non-numerical choices, right-click or double-click for options.
Clip properties play a vital role in the Animation system. Whenever you modify a clip property, a
key-frame is automatically created at the current playhead position. If you want a property change to apply
throughout the entire clip, ensure the playhead is positioned at or before the clip’s start, before making adjustments.
You can easily find a clip’s start by using the next/previous marker feature on the Timeline toolbar.
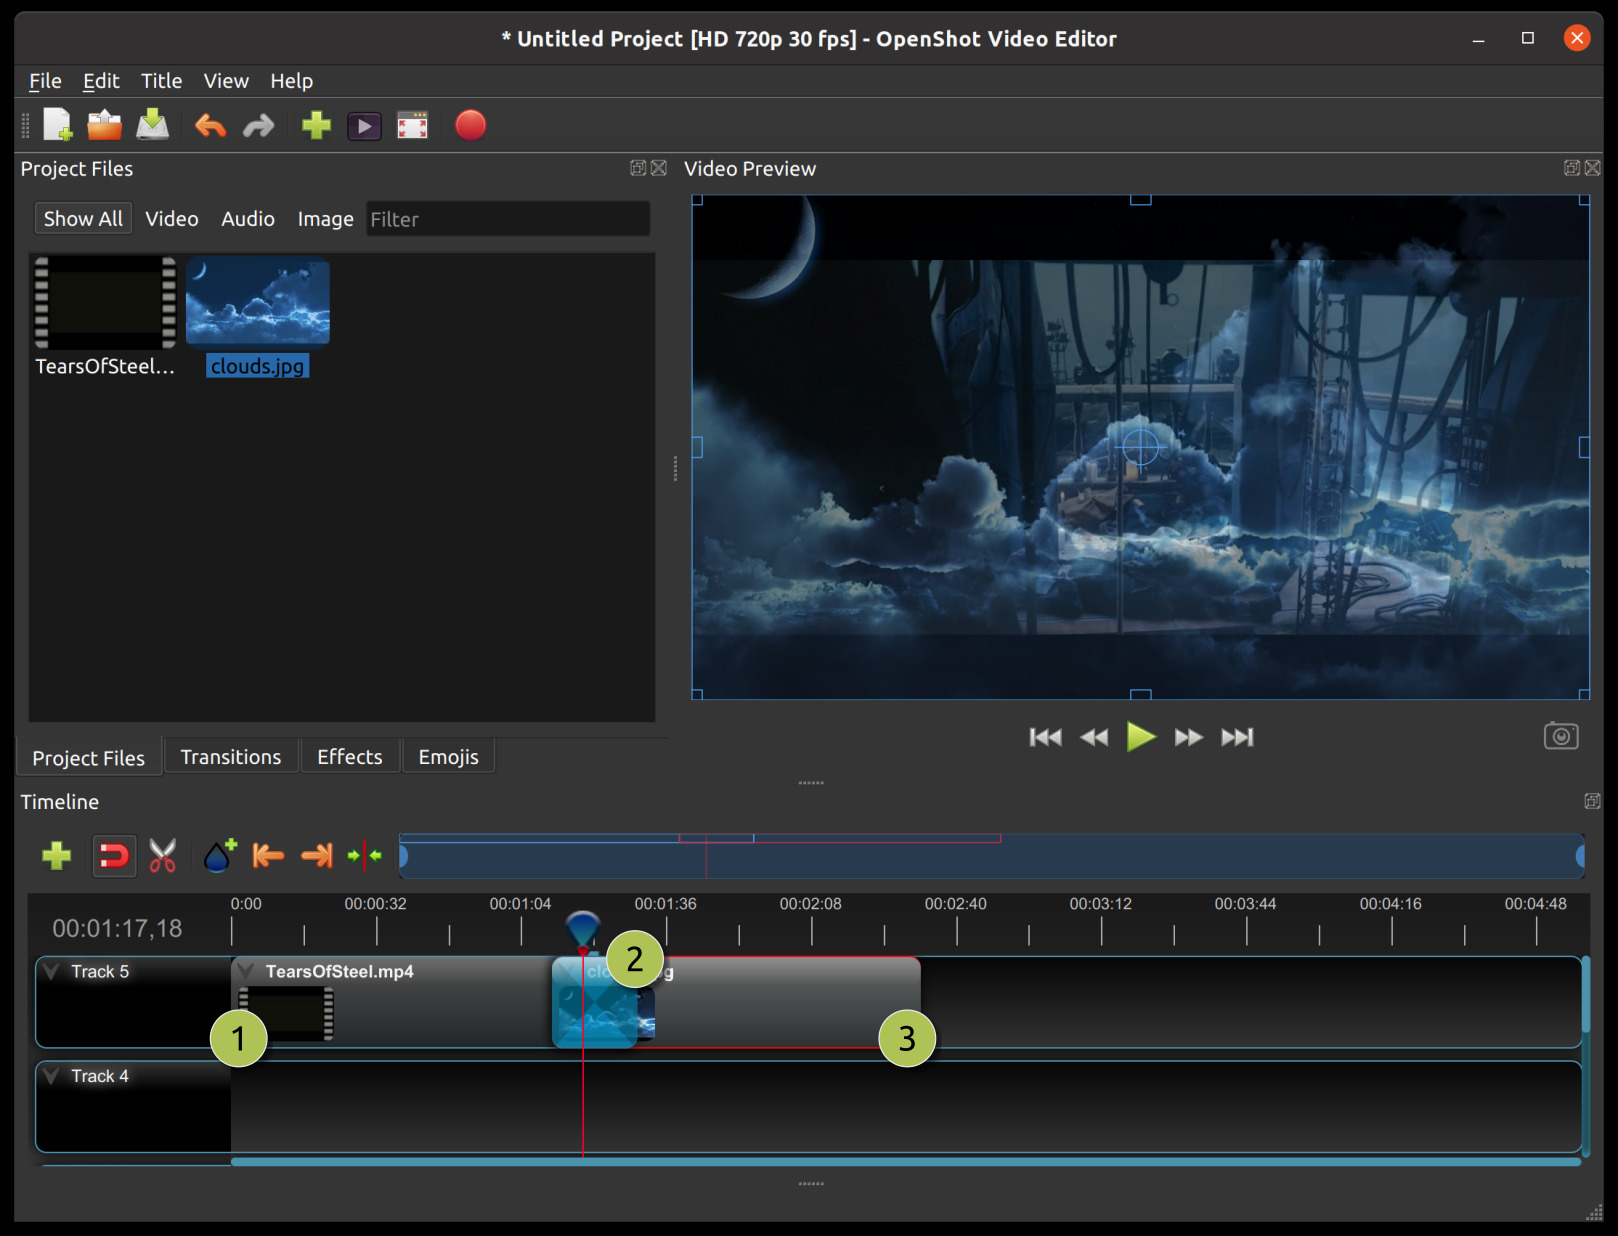
# |
Name |
Description |
|---|---|---|
1 |
Clip 1 |
A video clip |
2 |
Transition |
A gradual fade transition between the 2 clip images (does not affect the audio) |
3 |
Clip 2 |
An image clip |
Trimming & Slicing
OpenShot provides multiple ways to adjust the start and end trim positions of a clip (also known as trimming). The most common method is to click and drag the left or right edge of a clip. Trimming can be used to remove unwanted sections from the beginning or ending of a clip.
To slice a clip into smaller sections, OpenShot offers several options, including dividing or slicing a clip at the play-head (vertical playback line) position. Trimming and slicing clips are powerful tools that allow users to rearrange sections of video and remove unwanted parts.
Here is a list of all methods for cutting and/or trimming clips in OpenShot:
Trim & Slice Method |
Description |
|---|---|
Resizing Edge |
Mouse over the edge of a clip and resize it by dragging left or right. The left edge of a clip can not be resized smaller than 0.0 (i.e. the first frame of the file). The right edge of a clip can not be resized larger than the duration of a file (i.e. the last frame of a file). |
Slice All |
When the play-head overlaps multiple clips, right-click the play-head and choose Slice All. This will cut/slice all intersecting clips on all tracks. You can also use the keyboard shortcuts Ctrl+Shift+K to keep both sides, Ctrl+Shift+J to keep the left side, or Ctrl+Shift+L to keep the right side of the clips. |
Slice Selected |
When the play-head overlaps a clip, right-click the clip and choose Slice. This provides options to keep the left side, the right side, or both sides of the clip. Alternatively, use Ctrl+K to keep both sides, Ctrl+J to keep the left side, or Ctrl+L to keep the right side. |
Slice Selected (Ripple) |
Slice the selected clip(s) at the play-head position, keeping either the left side (shortcut: W) or the right side (shortcut: Q), while rippling the gap removal across the current track. |
Razor Tool |
The razor tool from the Timeline Toolbar cuts a clip at the position where it is clicked. Use SHIFT to slice and keep the left side, or CTRL to keep the right side. |
Split File Dialog |
Right-click on a file and choose Split File. This opens a dialog that allows you to create multiple clips from a single video file. |
Keep in mind that the above cutting methods also have Keyboard Shortcuts, to save even more time.
If multiple selected clips and/or transitions share the same left edge or right edge, you can drag that shared edge once to trim them together.
Selections
Selecting clips and transitions on the timeline is an essential part of editing in OpenShot. Multiple selection methods are available to streamline your workflow, enabling efficient editing of clips and transitions.
Here is a list of all methods for selecting clips in OpenShot:
Selection Method |
Description |
|---|---|
Box Selection |
Click and drag a selection box around clips or transitions to select multiple items at once. Hold down Ctrl to add to your current selection. |
Click Selection |
Click on a clip or transition to select it. This will deselect all other items unless you hold down Ctrl. |
Add to Selection |
Hold down Ctrl while clicking to add or remove clips from the current selection, allowing you to select non-adjacent clips. |
Range Selection |
Hold down Shift while clicking to select a range of clips/transitions from the previous selection to the new selection. This supports ranges that span multiple tracks as well. |
Ripple Selection |
Hold down Alt while clicking to ripple select all clips/transitions from your selection to the end of the track. This always adds to your current selection, even if Ctrl is not pressed. |
Clear Selection |
Click anywhere on the timeline or on a new clip/transition to reset the current selection, unless Ctrl is pressed. |
Select All |
Press Ctrl+A to select all clips and transitions on the timeline. |
Select None |
Press Ctrl+Shift+A to deselect all clips and transitions on the timeline. |
Mastering these selection techniques will streamline your editing process, especially when dealing with complex projects. For more advanced tips on selection and editing, refer to the Trimming & Slicing section.
Context Menu
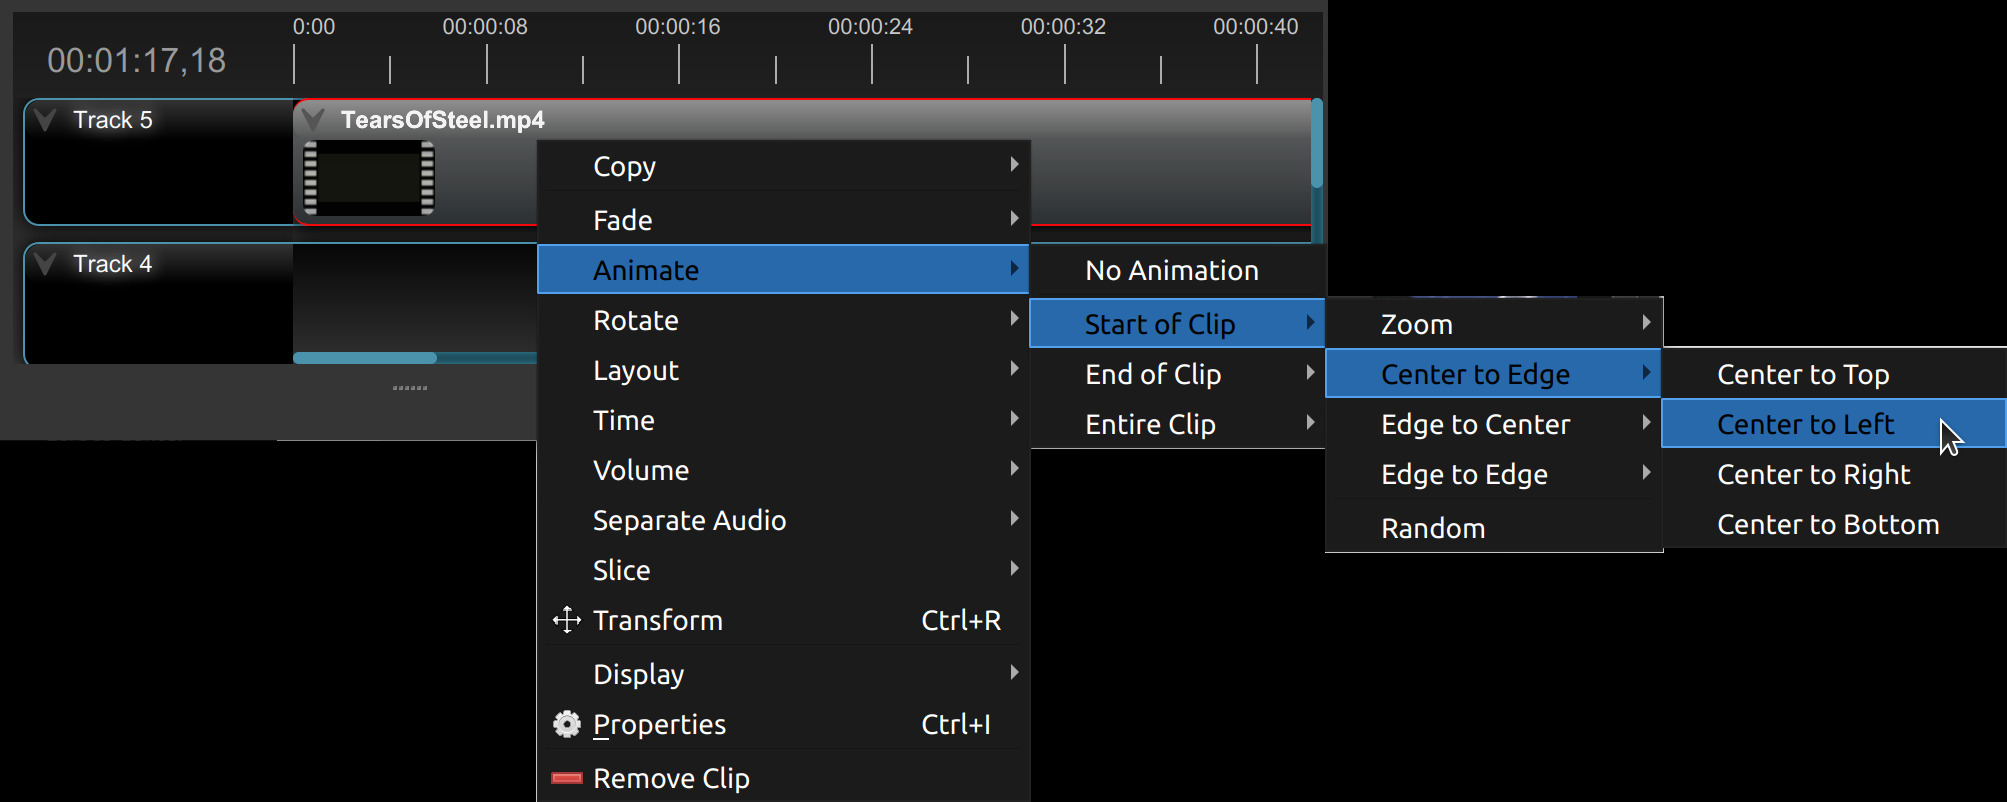
OpenShot has tons of great preset animations and clip properties, such as fading, sliding, zooming, reversing time, adjusting volume, etc… These presets can be accessed by right-clicking on a clip, revealing the context menu. A preset sets one (or more) clip properties for the user without needing to manually set the key-frame clip properties. See Clip Properties.
Some presets allow the user to target either the start, end, or entire clip, and most presets allow the user to reset a specific clip property. For example, when using the Audio → Volume presets, the user has the following menu options:
Reset Volume — resets the volume to the original level.
Start of Clip — the volume change applies at the beginning of the clip.
End of Clip — the volume change applies at the end of the clip.
Entire Clip — the volume change applies to the entire clip.
Preset Name |
Description |
|---|---|
Copy / Cut / Paste |
Copy selected clip data, cut selected clips, or paste copied clip data. Copy supports full clips, effects, and keyframe groups. |
Align |
Align the left or right edge of multiple selected clips and transitions (only shown when multiple clips are selected). |
Fade |
Fade the clip in or out — automatically fades video (alpha) and/or audio (volume) based on what the clip contains. |
Motion |
Add animated motion to a clip: slide in/out, bounce, blur, wipe/focus-wipe, zoom, emphasis effects at the playhead, camera movements, and scrolling credits. Only shown for visual clips. |
Transform |
Apply geometric presets to a clip: rotate/flip, crop, or snap to a corner layout. Also provides a No Transform reset. Only shown for visual clips. |
Look |
Apply visual style presets: color grades, film grain, analog tape, sharpen, blur, shadow, and glow effects. Includes Adjust Colors (Color Wheels editor) and Analyze Colors (video scopes). Only shown for visual clips. |
Speed |
Reverse, repeat, speed up, or slow down video. Includes Freeze and Freeze & Zoom options. |
Audio |
Control audio properties: adjust volume levels, fade volume in/out, separate audio channels, show/hide the timeline waveform, or open the Audio Levels scope. |
Slice |
Cut the clip at the play-head position, with options to keep either side, both sides, or ripple-delete one side. Only shown when the playhead overlaps the clip. |
Properties |
Show the properties panel for a clip. |
Remove Clip |
Remove a clip from the timeline. |
Fade
The Fade preset creates a smooth fade-in or fade-out on the selected clip. It automatically fades video (alpha/opacity) and/or audio (volume) depending on what the clip contains — a video clip gets both, an audio-only clip gets only a volume fade, and an image clip gets only an alpha fade.
No Fade — removes all fade keyframes.
Fade In → Fast / Slow — fades from transparent/silent at the start of the clip.
Fade Out → Fast / Slow — fades to transparent/silent at the end of the clip.
Fade In and Out → Fast / Slow — applies both a fade-in at the start and a fade-out at the end.
Fast fades span approximately 1 second; Slow fades span approximately 3 seconds. See Alpha and Volume key-frames.
Usage Example: Applying a fade-out to a video clip to gently conclude a scene.
Tip: Fade and Volume fade are independent — use Fade for a combined video+audio fade, or use Audio → Volume to fade only the audio.
Motion
The Motion menu adds animated movement to visual clips using keyframe presets. It is organized into several submenus. See Location X and Location Y and Scale X and Scale Y key-frames.
No Motion — removes all motion keyframes from the clip.
In — entrance animations applied at the start of the clip:
Back In (From Bottom / Left / Right / Top) — clip overshoots and springs back into position.
Blur In — clip fades in from a motion blur.
Bounce In (Center / From Bottom / Left / Right / Top) — clip bounces as it enters.
Focus Wipe In (Circle Expand / Circle Shrink / From Bottom / Left / Right / Top) — clip is revealed by a wipe while sharpening from blur into focus.
Pop In — clip scales up quickly from nothing.
Slide In (From Bottom / Left / Right / Top) — clip slides onto the screen.
Spiral In — clip rotates in while scaling up.
Wipe In (Circle Expand / Circle Shrink / From Bottom / Left / Right / Top) — clip is revealed by a wipe.
Out — exit animations applied at the end of the clip (mirrors the In options: Back Out, Blur Out, Bounce Out, Focus Wipe Out, Pop Out, Slide Out, Spiral Out, Wipe Out).
Emphasis — short attention-grabbing animations inserted at the current playhead position (not applied across the whole clip). Useful for mid-clip highlights: Bounce, Flash, Heartbeat, Jello, Pulse, Rubber Band, Shake X, Shake Y, Swing, Tada, Wobble.
Camera — simulates camera movement on the clip by animating scale and position:
Zoom → In / Out — a simple push-in or pull-out.
Pan → Auto Direction / Left to Right / Right to Left / Top to Bottom / Bottom to Top — a lateral camera pan. Auto Direction picks the best direction based on the clip’s aspect ratio.
Zoom & Pan → In or Out, with directional variants — combines a zoom with a pan (Ken Burns style). Auto Direction picks the best direction based on the clip’s aspect ratio.
Credits — scrolling credit animations: Scroll Up and Scroll Down.
Tip: Emphasis presets are placed at the current playhead position, so position the playhead over the moment you want to highlight before applying one.
Tip: Camera presets use Auto Direction by default, which picks the optimal pan direction for wide or tall media to avoid black bars.
Rotate
The Transform → Rotate submenu introduces easy rotation and flipping of clips. It enables orientation adjustment by rotating and flipping a clip for creative visual transformations. See Rotation key-frame.
No Rotation — removes any rotation keyframes.
Rotate 90 (Right) — rotates the clip 90 degrees clockwise.
Rotate 90 (Left) — rotates the clip 90 degrees counterclockwise.
Rotate 180 (Flip) — flips the clip upside down.
Usage Example: Rotating a photo or video by 90 degrees (a portrait video to a landscape).
Usage Example: If your video is upside down, rotate it by 180 degrees to correct the orientation.
Layout
The Transform → Layout submenu adjusts the size of a clip and snaps it to a chosen corner of the screen, useful for picture-in-picture or watermark effects. See Location X and Location Y, Scale X and Scale Y, Margin, and Corner Radius key-frames.
Reset Layout — removes any layout keyframes.
1/4 Size — positions the clip at 1/4 of the screen in the Center, Top Left, Top Right, Bottom Left, or Bottom Right corner.
Show All (Maintain Ratio) — fits the entire clip frame within the screen while preserving its aspect ratio.
Show All (Distort) — stretches the entire clip frame to fill the screen, ignoring aspect ratio.
Usage Example: Placing a logo in the corner of a video using the layout preset.
Tip: Use Margin to create an inset layout area for a clip, and Corner Radius to round picture-in-picture camera clips without adding a Mask effect.
Tip: Combine with animation presets for dynamic transitions involving resizing and repositioning.
Speed
The Speed menu manipulates clip playback speed, allowing for reverse playback, time-lapse, slow-motion, freezes, and looping effects. See Time key-frame.
Reset Speed — restores the clip to normal 1× speed.
Reverse — plays the clip backwards at normal speed.
Speed Up → Forward / Backward → 2×, 4×, 8×, 16× — speeds up playback in either direction.
Slow Down → Forward / Backward → 1/2×, 1/4×, 1/8×, 1/16× — slows down playback in either direction.
Repeat — see below.
Freeze — freezes on the frame at the current playhead position for 2, 4, 6, 8, 10, 20, or 30 seconds.
Freeze && Zoom — freezes and simultaneously zooms in on that frozen frame.
Slow motion — Slow Down → 1/2× or 1/4× for dreamy or dramatic footage.
Time-lapse — Speed Up → 8× or 16× to compress hours into seconds.
Speed ramp — use the Timing tool to drag clip edges and create a natural-feeling speed change; OpenShot scales all keyframes automatically.
Tip: Combine Freeze with Speed Up for an impact-freeze-then-fast-forward effect.
Repeat
Use Speed → Repeat to play a clip multiple times, without building the time curve by hand. OpenShot writes the needed Time keyframes for you (you can edit them later).
Menu path
Speed → Repeat → Loop → Forward – plays left to right, then starts again from the beginning
Speed → Repeat → Loop → Reverse – plays right to left, then starts again from the end
Speed → Repeat → Ping-Pong → Forward – forward, then backward, then forward…
Speed → Repeat → Ping-Pong → Reverse – backward, then forward, then backward…
Custom… – opens a dialog for extra options (see below)
Counts are finite (2x, 3x, 4x, 5x, 8x, 10x, or a custom number). Example: “Forward then Back and stop” = Ping-Pong → Forward → 2x.
What gets repeated
Repeat always acts on the currently trimmed in/out of the clip.
The Time curve is stamped as a simple shape: - Loop Forward = rising saw - Loop Reverse = falling saw - Ping-Pong = triangle (direction flips each pass)
To avoid a double frame at the seam, the last frame of each pass is not duplicated.
Keyframes during Repeat
When you use Repeat, OpenShot will also repeat other keyframes found inside the trimmed section (location, scale, effects, etc.) into each pass so your animations stay in sync.
Repeated keyframes keep their relative timing inside each pass.
Custom Repeat (dialog options)
Pattern: Loop | Ping-Pong
Direction: Forward | Reverse
Passes: integer (2 or more). This is the number of times it will play.
Delay: number + units [frames | ms | sec]. This is an optional delay between each repeated pass.
Speed Ramp (%): % speed change per pass (optional). Positive speeds up each pass; negative slows down each pass.
Reset
Speed → Reset Speed completely removes any Time curve (including Repeat) and restores the clip to its original playback, without deleting your original non-Time keyframes.
Timing Tool
Another way to change a clip’s speed is with the Timing tool on the timeline toolbar. Enable the clock icon and drag a clip’s edges. Lengthening the clip slows playback, while shotening it speeds the clip up. All keyframes on the clip and its effects are scaled so their relative positions remain intact.
Look
The Look menu applies one-click visual style presets to clips. All presets work by adding or updating effects on the clip — you can inspect or animate them further in the Properties dock. The menu is organized into four submenus plus two direct actions at the bottom.
Reset Look — removes all Look-managed effects (Color Grade, Film Grain, Analog Tape, Sharpen, Blur, Shadow, Glow) from the selected clips in a single step.
Color — applies a Color Grade effect with one of four quick presets:
Auto Contrast — boosts contrast by lifting shadows and pulling highlights.
Lift Shadows — brightens the dark areas of the image.
Warm Up — shifts the color balance toward warm orange/amber tones.
Boost Color — increases color saturation.
Film — cinematic film simulation:
Film Grain → No Film Grain, then: 35mm Fine, 35mm Classic, 35mm Gritty, 16mm Classic, Super 8, High ISO — adds photographic grain at various strengths and sizes.
Analog Tape → No Analog Tape, then: Subtle, VHS, Heavy — adds tape noise and color degradation for a retro video look.
Focus — sharpness adjustments:
Sharpen → No Sharpen, then: Subtle, Medium, Strong — sharpens fine detail.
Blur → No Blur, then: Soft Focus, Medium, Heavy — softens the image.
Lighting — light and shadow overlays:
Shadow → No Shadow, then: Subtle, Soft, Strong, Long — casts a drop shadow across the clip.
Glow → No Glow, then: Soft White, Warm, Neon, Inner Glow — adds a soft halo or glow effect.
At the bottom of the Look menu:
Adjust Colors — opens the Color Wheels dock for full manual color grading with lift/gamma/gain wheels, curves, and an Amount/Luma blend slider.
Analyze Colors — opens the Luma Waveform and Histogram video scopes on the right side of the window, tabified together.
Tip: Each Look submenu has a “No …” option at the top to remove just that single effect without affecting the others.
Tip: After applying a Look preset, double-click the effect badge on the clip (or use Properties) to fine-tune every parameter or animate it over time.
Audio
The Audio menu groups all audio-related clip actions in one place.
Volume — controls the clip’s audio level. See Volume key-frame.
Reset Volume — removes all volume keyframes, returning to full (1×) volume.
Level — sets a fixed volume percentage (0 % to 130 %) for the entire clip.
Fade In → Fast / Slow — fades volume from silence at the start of the clip.
Fade Out → Fast / Slow — fades volume to silence at the end of the clip.
Fade In and Out → Fast / Slow — applies both a volume fade-in and fade-out.
Separate — splits the audio track out of a clip:
Single Clip (all channels) — creates one detached audio clip on a layer below the original.
Multiple Clips (each channel) — creates separate detached audio clips, one per audio channel, on multiple layers below the original.
Show Waveform / Hide Waveform — toggles the audio waveform visualization on the timeline for audio-only clips. Only shown for clips that do not have a video track.
Analyze Levels — opens the Audio Levels scope dock. If other scope docks are already open, OpenShot tabifies Audio Levels with them.
Usage Example: Applying a gradual volume fade-out to transition between scenes.
Usage Example: Extracting background music from a video clip for independent volume control.
Tip: Use Audio → Volume → Fade In/Out for audio-only fades. Use the top-level Fade menu for a combined video+audio fade.
Slice
The Slice tool lets you cut a clip at the position of the play-head (the vertical line that shows your current position in the timeline). This will split the clip into two separate parts at the exact point where the play-head is.
Slicing is a key feature for making precise edits and rearranging sections of your video. You can slice a clip and choose to keep one side or both, and with the ripple option, you can automatically shift other clips on the same track to fill any gaps caused by the cut.
Slicing Options:
Keep Both Sides: This option splits the clip into two parts, keeping everything on both sides of the play-head. It’s useful when you want to break a clip into sections but don’t want to remove anything.
Keep Left Side: This option cuts the clip and removes the part to the right of the play-head, keeping only the part before the play-head. Use this to get rid of the portion of the clip that comes after the current point.
Keep Right Side: This option cuts the clip and removes the part to the left of the play-head, keeping only the part after the play-head. It’s handy for trimming away the beginning of a clip and keeping the rest.
Ripple Slicing: Ripple slicing not only cuts the clip but also moves any clips and transitions that follow to close the gap. This way, your timeline stays continuous without empty spaces after a cut, saving you the trouble of manually adjusting the clips that come after.
Tips for Beginners:
Example: If there’s a part of a clip you don’t want (like the end of a scene), use Keep Left Side or Keep Right Side to remove it. If you want to split a scene into multiple smaller sections to rearrange, use Keep Both Sides.
Quick Tip: Slicing can also be used to break a long clip into smaller parts, making it easier to manage and edit each section separately.
For a complete guide to slicing and all available keyboard shortcuts, see the Trimming & Slicing section.
Transform
The Transform context menu provides geometric preset actions for visual clips:
No Transform — removes all Rotate, Layout, and crop presets from the selected clips in one step.
Rotate — rotate or flip the clip. See the Rotate section above.
Crop — add or remove a crop effect. See the Crop section below.
Layout — resize and snap the clip to a corner or fit position. See the Layout section above.
Transform Tool
The Transform Tool lets you quickly adjust a clip directly in the preview window, instead of changing location, scale, rotation, shear, and rotation origin values one property at a time. OpenShot shows the Transform Tool automatically whenever you select a clip on the timeline, with blue lines and handles drawn around the selected clip. You can also select multiple clips at once with Ctrl or Shift; in that case, the preview shows one set of handles around the full selection, and any move, scale, or rotation is applied to all selected clips together.
Dragging the blue squares will adjust the scale of the image.
Dragging the center will move the location of the image.
Dragging the mouse on the outside of the blue lines will rotate the image.
Hold Ctrl or Shift while rotating to snap to 15-degree increments.
Dragging along the blue lines will shear the image in that direction.
Dragging the circle in the middle will move the origin point that controls the center of rotation.
Note: Pay close attention to the play-head position (red playback line). Key frames are automatically created at the current playback position, to help quickly create animations. If you want to transform a clip with no animation, be sure the playhead is positioned before (to the left) of your clip. You can also manually adjust these same clip properties in the property editor, see Clip Properties.

Usage Example: Use the transform handles to resize and reposition a clip for a picture-in-picture effect.
Tip: Use these handles to precisely control a clip’s appearance.
Crop
The Transform → Crop submenu adds a crop effect to the selected clip and displays interactive crop handles in the video preview. The submenu offers:
No Crop – remove any existing crop effect.
Crop (No Resize) – trim the clip without scaling the remaining area.
Crop (Resize) – trim the clip and scale the cropped region to fill the frame.
Drag the blue handles to adjust the crop boundaries, move the cropped area around, or move the center handle to reposition the image inside the cropped area.
Waveform
The Audio → Show Waveform / Hide Waveform action toggles whether an audio-only clip shows its waveform visualization on the timeline instead of the default thumbnail. This option only appears for clips that have no video track.
Usage Example: Displaying the audio waveform for precise audio editing and alignment.
Tip: Use this to visually spot loud or quiet sections in a music clip without opening the audio scopes.
How timeline waveforms are scaled
Timeline waveforms are an editing aid: they help you find speech, beats, silence, and transients, and compare the approximate levels of different clips. New waveform data preserves the source’s absolute peak level. OpenShot does not enlarge every quiet file until its highest peak fills the clip, so a quiet recording remains visibly quieter than a loud recording.
Pure linear amplitude is accurate but makes ordinary speech difficult to see. OpenShot therefore applies a fixed, gentle square-root display curve. This expands useful detail while preserving the order of levels: a louder source always appears taller than a quieter source. The curve changes only the drawing; it does not alter, normalize, or process the recorded audio.
Peak Level |
Display Height |
What It Often Looks Like |
|---|---|---|
|
100% |
Full-scale peak; check for possible clipping. |
|
71% |
Strong transient or loud program audio. |
|
50% |
Healthy speech or other prominent audio. |
|
32% |
Moderate speech or background program audio. |
|
10% |
Quiet room tone or microphone noise floor. |
|
3% |
Very quiet detail near the center line. |
OpenShot samples both peak and RMS envelopes at regular time intervals. The lighter outer envelope shows brief peaks and transients; the solid inner envelope shows sustained RMS energy. Both follow the clip’s Volume and Time curves and use the same fixed display curve. A subtle center line keeps silent passages identifiable without making them look louder than they are.
New waveforms use 200 samples per second by default, providing several measurements within a typical video frame. Change this density with Edit → Preferences → Timeline → Waveform Samples (per second). Higher values show more detail when zoomed in but increase project data size and analysis time. The painter reduces dense data to the visible timeline pixels, and its rendered-waveform cache keeps normal scrolling and repainting inexpensive. Live microphone previews use the selected density and the same peak/RMS display as completed recordings.
Projects saved by older OpenShot versions can contain independently peak-normalized waveform data. These waveforms have no format marker, so OpenShot deliberately displays them with the original legacy scaling. They remain familiar instead of becoming unexpectedly thin. Older waveform data without a stored density defaults to its original 20 samples per second, and data without an RMS envelope remains a single solid waveform. A project may safely contain legacy and new waveforms together.
To regenerate cached waveform data using the current method, choose Edit → Clear → Waveform Display Data, then show the waveform again. This affects only cached display data and does not modify the media file or its audio.
Note
The peak envelope identifies transient level and possible clipping; RMS summarizes sustained energy but is not a loudness-standard measurement. Use the Audio Levels scope and your ears when mixing. See Playback for audio troubleshooting.
Properties
The Properties preset opens the properties panel for a clip, allowing quick access for adjustments to clip properties, such as location, scale, rotation, etc… See Clip Properties.
Usage Example: Adjusting clip properties like opacity, volume, or position.
Tip: Apply this preset to streamline adjustments to all clip properties in a single dock.
Copy / Cut / Paste
The Copy / Paste preset allows copying and pasting keyframes, effects, or duplicating an entire clip along with its keyframes. Paste will create a new clip at the position of your mouse. If you select 1 or more clips before pasting, you can paste “over” those clips with your current clip.
Usage Example: Duplicating a clip with intricate animations for reuse in different parts of the project.
Tip: Use this preset to replicate animations or effects across multiple clips.
Tip: Selecting multiple clips before pasting, sets keyframes and/or effects for all clips.
Tip: You can copy a single effect, and paste it to multiple selected clips.
Remove Gaps
The Remove Gap and Remove All Gaps options help you quickly eliminate gaps between clips on the timeline by rippling (i.e., shifting) subsequent clips to close the gap. These options can be accessed via the context menu and are only available when gaps are detected.
Remove Gap: - This option deletes a specific gap between two clips on the timeline. Right-click on the gap between clips to access the Remove Gap option. - Usage: Use this option to quickly eliminate a specific gap caused by trimming or using the razor tool.
Remove All Gaps: - This option removes all gaps between clips on the timeline for the entire track. Right-click on the track name to access the Remove All Gaps option. - Usage: Ideal for tracks that contain back-to-back clips, such as a photo slideshow, where no gaps are desired.
Remove Clip
The Remove Clip option lets you delete a clip from the timeline. Removing clips is an essential part of organizing your project and getting rid of unwanted sections. Removing a clip can also impact the surrounding clips. If you want to clean up the gap that remains after deleting a clip, you have a few options to automatically adjust your timeline.
How to Remove a Clip: To delete a clip, simply select it and press Delete on your keyboard, or right-click the clip and choose Remove Clip from the context menu. You can also select multiple clips at once by holding down the Ctrl key and clicking on additional clips, then remove them all at once.
Ripple Delete: If you want to delete a clip and automatically remove the empty space (gap) it leaves behind, use the Ripple Delete feature by pressing Shift+Delete. This will shift all the remaining clips and transitions on the track to the left, filling in the gap and keeping your timeline smooth and continuous.
Remove Gap: After deleting a clip, if you have gaps left in your timeline that you want to remove, simply right-click in the empty space and choose Remove Gap. This action will shift all clips and transitions to the left, closing the gap and maintaining the flow of your video.
Tips for Beginners:
Example: If you have a clip that’s no longer needed, such as an intro you’ve decided not to use, you can quickly select it and either delete it or use Ripple Delete to remove it and shift everything left to close the gap.
For more advanced editing options and shortcuts, refer to the Trimming & Slicing section.
Effects
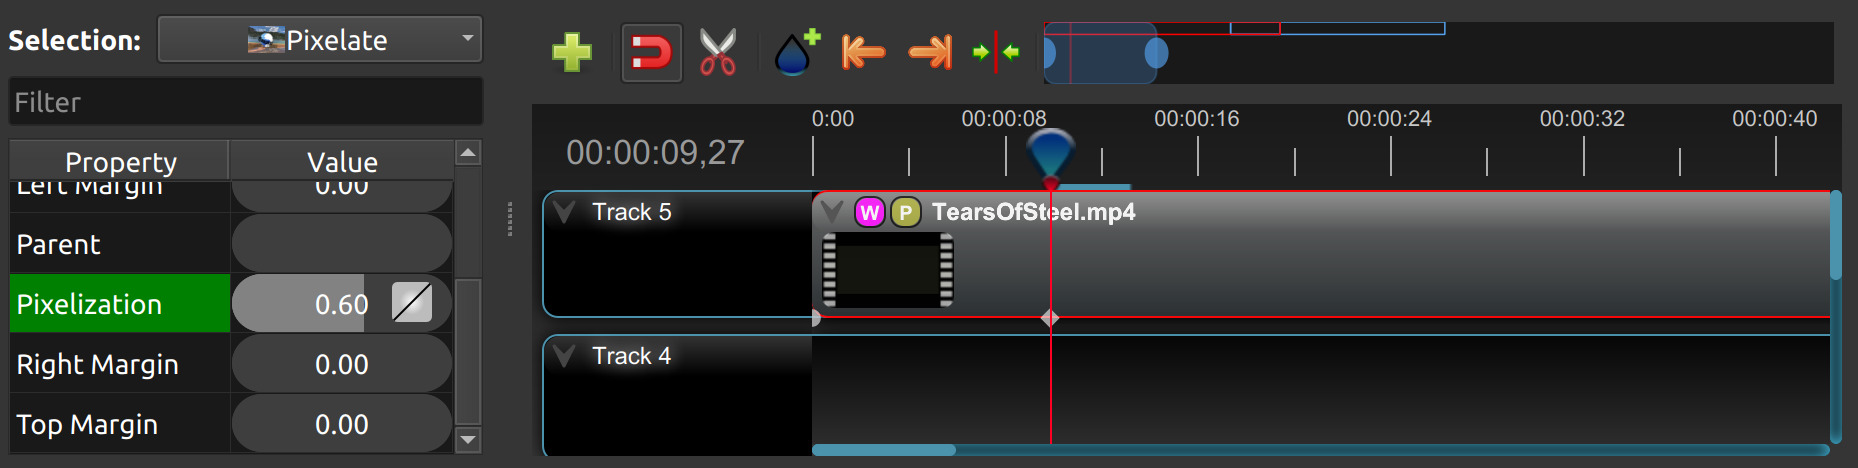
In addition to the many clip properties which can be animated and adjusted, you can also drop an effect directly onto a clip from the effects dock. Each effect is represented by a small colored letter icon. Clicking the effect icon will populate the properties of that effect, and allow you to edit (and animate) them. For the full list of effects, see Effects.
Clip Properties
Below is a list of clip properties which can be edited, and in most cases, animated over time. To view a clip’s properties,
right click and choose Properties. The property editor will appear, where you can change these properties.
You can select multiple clips, transitions or effects at once. The dropdown at
the top of the dock shows entries for each item plus an entry such as 2
Selections. Pick that entry to edit all selected items together, only
properties they share will be visible. If a field is blank, the values differ
between items, but you can still change it or insert a keyframe for all of them.
Note: Pay close attention to where the play-head (i.e. red playback line) is. Key frames are automatically created at the current playback position, to help quickly create animations.
When animating clip properties, you can fade a clip from opaque to transparent with alpha, slide a clip around the
screen with location_x and location_y, scale a clip smaller or larger with the scale_x and scale_y,
fade the volume of a clip quieter or louder with volume, and much more. If you want to set a single, static clip property with
no animation, be sure the playhead is positioned at the start of your clip (to the left) when adjusting the property value.
See the table below for a full list of clip properties.
Clip Property Name |
Type |
Description |
|---|---|---|
Alpha |
Key-Frame |
Curve representing the alpha for fading the image and adding transparency (1 to 0) |
Channel Filter |
Key-Frame |
A number representing an audio channel to filter (clears all other channels) |
Channel Mapping |
Key-Frame |
A number representing an audio channel to output (only works when filtering a channel) |
Composite (Blend Mode) |
Enum |
The blend mode used to composite this clip into lower layers. Default is Normal. See Composite (Blend Mode). |
Corner Radius |
Key-Frame |
Curve representing the radius used to round the clip’s corners (0 to 0.5) |
Duration |
Float |
The length of the clip (in seconds). Read-only property. This is calculated by: End - Start. |
Enable Audio |
Enum |
An optional override to determine if this clip has audio (-1=undefined, 0=no, 1=yes) |
Enable Video |
Enum |
An optional override to determine if this clip has video (-1=undefined, 0=no, 1=yes) |
End |
Float |
The end trimming position of the clip (in seconds) |
Frame Number |
Enum |
The format to display the frame number (if any) |
Gravity |
Enum |
The gravity of a clip determines where it snaps to its parent (details below) |
ID |
String |
A randomly generated GUID (globally unique identifier) assigned to each clip. Read-only property. |
Location X |
Key-Frame |
Curve representing the relative X position in percent based on the gravity (-1 to 1) |
Location Y |
Key-Frame |
Curve representing the relative Y position in percent based on the gravity (-1 to 1) |
Margin |
Key-Frame |
Curve representing edge spacing for gravity-aligned clips (0 to 0.5) |
Origin X |
Key-Frame |
Curve representing the rotation origin point, X position in percent (-1 to 1) |
Origin Y |
Key-Frame |
Curve representing the rotation origin point, Y position in percent (-1 to 1) |
Parent |
String |
The parent object to this clip, which makes many of these keyframe values initialize to the parent value |
Position |
Float |
The position of the clip on the timeline (in seconds, 0.0 is the beginning of the timeline) |
Rotation |
Key-Frame |
Curve representing the rotation (0 to 360) |
Scale |
Enum |
The scale determines how a clip should be resized to fit its parent (details below) |
Scale X |
Key-Frame |
Curve representing the horizontal scaling in percent (0 to 1) |
Scale Y |
Key-Frame |
Curve representing the vertical scaling in percent (0 to 1) |
Shear X |
Key-Frame |
Curve representing X shear angle in degrees (-45.0=left, 45.0=right) |
Shear Y |
Key-Frame |
Curve representing Y shear angle in degrees (-45.0=down, 45.0=up) |
Start |
Float |
The start trimming position of the clip (in seconds) |
Time |
Key-Frame |
Curve representing the frames over time to play (used for speed and direction of video) |
Track |
Int |
The layer which holds the clip (higher tracks are rendered on top of lower tracks) |
Volume |
Key-Frame |
Curve representing the volume for fading audio quieter/louder, mute, or adjusting levels (0 to 1) |
Volume Mixing |
Enum |
The volume mixing choices control how volume is adjusted before mixing (None=don’t adjust volume of this clip, Reduce=lower the volume to 80%, Average=divide volume based on # of concurrent clips, details below) |
Wave Color |
Key-Frame |
Curve representing the color of the audio waveform |
Waveform |
Bool |
Should a waveform be used instead of the clip’s image |
Waveform Mode |
Enum |
The visualization style used when displaying the clip as an audio waveform |
Composite (Blend Mode)
The Composite (Blend Mode) property controls how the pixels of this clip mix with the clips on lower tracks. If you are new to this, start with Normal. Switch modes when you want a quick creative change without adding an effect.
Beginner tips
Want to brighten light effects, flares, or smoke over a dark scene? Try Screen or Add.
Want to darken or place a texture over footage (paper grain, grids, shadows)? Try Multiply or Color Burn.
Want more contrast without crushing blacks and whites too much? Try Overlay or Soft Light.
Want a creative/inverted look or to line things up? Try Difference or Exclusion.
Common modes (recommended)
Mode |
What it does |
|---|---|
Normal |
Standard alpha compositing. Respects transparency from the clip. |
Darken |
Chooses the darker pixel from the two layers, per channel. |
Multiply |
Multiplies colors. Darkens and helps textures sit on top of footage. |
Color Burn |
Pushes shadows darker and boosts contrast; can clip to black. |
Lighten |
Chooses the lighter pixel from the two layers, per channel. |
Screen |
The opposite of Multiply. Brightens; great for light, glow, fire, fog. |
Color Dodge |
Brightens highlights strongly; can blow out to white. |
Add |
Adds pixel values. Strong brightening; clips at white. Also called Linear Dodge (Add). |
Overlay |
Mix of Multiply and Screen using the lower layer to decide. Adds punchy contrast. |
Soft Light |
Gentle contrast curve; softer than Overlay. |
Hard Light |
Stronger, edgy contrast using the upper layer to drive the change. |
Difference |
Absolute difference between layers. Creates inverted/psychedelic colors; useful for alignment. |
Exclusion |
Softer version of Difference with less contrast. |
Notes
Blend modes affect color, while alpha (the Alpha property) affects transparency. You can use both.
Some modes can create very bright or very dark results. If needed, lower the Alpha property to soften.
The exact look of Multiply/Screen/Overlay family is best when project colors are in a linear color space.
Alpha
The Alpha property is a key-frame curve that represents the alpha value, determining fading and transparency of the image in the clip. The curve ranges from 1 (fully opaque) to 0 (completely transparent).
Usage Example: Applying a gradual fade-in or fade-out effect to smoothly transition clips.
Tip: Use keyframes to create complex fading patterns, such as fading in and then fading out for a ghostly effect.
Corner Radius
The Corner Radius property is a key-frame curve that rounds the visible corners of a clip. The curve ranges from 0 (square corners) to 0.5 (maximum rounding, based on the clip’s shortest side).
Usage Example: Rounding the corners of a picture-in-picture camera recording without adding a separate mask effect.
Usage Example: In Recording View, corner webcam clips use this property for the Corners setting.
Tip: Use 0 for normal full-frame video, a small value for rounded rectangles, or 0.5 for a pill or oval-like shape.
Channel Filter
The Channel Filter property is a key-frame curve used for audio manipulation. It specifies a single audio channel to be filtered while clearing all other channels.
Usage Example: Isolating and enhancing specific audio elements, like isolating vocals from a song.
Tip: Combine with the “Channel Mapping” property to route the filtered channel to a specific audio output.
Channel Mapping
The Channel Mapping property is a key-frame curve that defines the output audio channel for the clip. This property works in conjunction with the “Channel Filter” property and specifies which channel is retained in the output.
Usage Example: Keeping the filtered channel’s audio while discarding others for an unconventional audio mix.
Tip: Experiment with mapping different channels to create unique audio effects, like panning sounds between speakers.
Frame Number
The Frame Number property specifies the format in which the frame numbers are displayed within the clip, if applicable.
Usage Example: Displaying frame numbers in the top left corner of the clip, as either absolute frame number or relative to the start of the clip.
Tip: This can help with identifying precise frame numbers or troubleshooting a problem.
Duration
The Duration property is a float value indicating the length of the clip in seconds. This is a Read-only property. This is calculated by: End - Start. To modify duration, you must edit the Start and/or End clip properties.
Usage Example: Inspect the duration of a clip to ensure it fits a specific time slot in the project.
Tip: Consider using the “Duration” property for clips that need to match specific time intervals, such as dialogue or scenes.
End
The End property defines the trimming point at the end of the clip in seconds, allowing you to control how much of the clip is visible in the timeline. Changing this property will impact the Duration clip property.
Usage Example: Trimming the end of a clip to align with another clip or trimming off unwanted sections of the clip.
Tip: Combine the “Start” and “End” properties to precisely control the visible portion of the clip.
Gravity
The Gravity clip property sets the initial display position coordinate (X,Y) for the clip, after it has been
scaled (see Scale). This affects where the clip picture is initially displayed on the screen, for example
Top Left or Bottom Right. The default gravity option is Center, which displays the picture in the very
center of the screen. The gravity options are:
Top Left – The top and left edges of the clip align with the top and left edges of the screen
Top Center – The top edge of the clip aligns with the top edge of the screen; the clip is horizontally centered on the screen.
Top Right – The top and right edges of the clip align with the top and right edges of the screen
Left – The left edge of the clip aligns with the left edge of the screen; the clip is vertically centered on the screen.
Center (default) – The clip is centered horizontally and vertically on the screen.
Right – The right edge of the clip aligns with the right edge of the screen; the clip is vertically centered on the screen.
Bottom Left – The bottom and left edges of the clip align with the bottom and left edges of the screen
Bottom Center – The bottom edge of the clip aligns with the bottom edge of the screen; the clip is horizontally centered on the screen.
Bottom Right – The bottom and right edges of the clip align with the bottom and right edges of the screen
Enable Audio
The Enable Audio property is an enumeration that overrides the default audio setting for the clip. Possible values: -1 (undefined), 0 (no audio), 1 (audio enabled).
Usage Example: Turning off unwanted audio for a clip, like ambient noise.
Tip: Use this property to control audio playback for specific clips, especially clips which have no useful audio track.
Enable Video
The Enable Video property is an enumeration that overrides the default video setting for the clip. Possible values: -1 (undefined), 0 (no video), 1 (video enabled).
Usage Example: Disabling the video of a clip while retaining its audio for creating audio-only sequences.
Tip: This property can be helpful when creating scenes with audio commentary or voiceovers.
ID
The ID property holds a randomly generated GUID (Globally Unique Identifier) assigned to each clip, ensuring its uniqueness. This is a Read-only property, and assigned by OpenShot when a clip is created.
Usage Example: Referencing specific clips within custom scripts or automation tasks.
Tip: While typically managed behind the scenes, understanding clip IDs can aid in advanced project customization.
Track
The Track property is an integer indicating the layer on which the clip is placed. Clips on higher tracks are rendered above those on lower tracks.
Usage Example: Arranging clips in different layers for creating visual depth and complexity.
Tip: Use higher tracks for elements that need to appear above others, like text overlays or graphics.
Location X and Location Y
The Location X and Location Y properties are key-frame curves that determine the relative position of the clip, expressed in percentages, based on the specified gravity. The range for these curves is -1 to 1. See Transform.
Usage Example: Animating a clip’s movement across the screen using key-frame curves for both X and Y locations.
Tip: Combine with gravity settings to create dynamic animations that adhere to consistent alignment rules.
Margin
The Margin property is a key-frame curve that creates an inset layout area for a clip. The curve is measured as a percentage of the project’s shortest side and ranges from 0 to 0.5. For example, in a 1920x1080 project, a margin of 0.05 creates a 54-pixel inset on every side, and the clip is laid out inside the remaining rectangle.
Margin is applied before the clip’s scale and gravity are calculated. This means Scale modes such as
Fit, Crop, and Stretch use the smaller inset area instead of the full project frame. It also means all
Gravity options, including Center, are resolved inside the inset area.
Usage Example: Keeping a corner webcam clip slightly away from the screen edge during a screen recording.
Usage Example: Adding a clean border around a full-frame image by using
FitorStretchwith a small margin.Usage Example: Creating safe-area layouts, split-screen spacing, or picture-in-picture spacing without adding Crop or Mask effects.
Usage Example: In Recording View, screen-plus-camera recordings use this property to inset the corner webcam clip.
Tip: Use a small value such as 0.02 to 0.05 for normal edge spacing. Larger values intentionally shrink the available layout area.
Volume Mixing
The Volume Mixing property is an enumeration that controls how volume adjustments are applied before mixing audio. Options: None (no adjustment), Reduce (volume lowered to 80%), Average (volume divided based on the number of concurrent clips).
Usage Example: Automatically lowering the volume of a clip to allow background music to stand out more prominently.
Tip: Experiment with volume mixing options to achieve balanced audio levels across different clips.
Mixing audio involves adjusting volume levels so that overlapping clips do not become too loud (creating audio distortion and loss of audio clarity). If you combine particularly loud audio clips on multiple tracks, clipping (a staccato audio distortion) may occur. To avoid distortion, OpenShot might need to reduce the volume levels in overlapping clips. The following audio mixing methods are available:
None - Make no adjustments to volume data before mixing audio. Overlapping clips will combine audio at full volume, with no reduction.
Average - Automatically divide the volume of each clip based on the # of overlapping clips. For example, 2 overlapping clips would each have 50% volume, 3 overlapping clips would each have 33% volume, etc…
Reduce - Automatically reduce overlapping clips volume by 20%, which reduces the likelihood of becoming too loud, but does not always prevent audio distortion. For example, if you have 10 loud clips overlapping, each with a 20% reduction in volume, it might still exceed the max allowable volume and exhibit audio distortion.
For quickly adjusting the volume of a clip, you can use the Audio → Volume menu. See Context Menu. For precise control over the volume of a clip, you can manually set the Volume Key-frame. See Volume.
Origin X and Origin Y
The Origin X and Origin Y properties are key-frame curves that define the rotation origin point’s position in percentages. The range for these curves is -1 to 1. See Transform.
Usage Example: Rotating a clip around a specific point, such as a character’s pivot joint.
Tip: Set the origin point to achieve controlled and natural-looking rotations during animations.
Clip Parent
The Parent property of a clip sets the initial keyframe values to the parent object. For example, if many clips all point to the
same parent clip, they will inherit all their default properties, such as location_x, location_y, scale_x, scale_y, etc…
This can be very useful in certain circumstances, such as when you have many clips that need to move or scale together.
Usage Example: Creating complex animations by establishing a parent-child relationship between clips.
Tip: Utilize this property to propagate changes from the parent clip to child clips for consistent animations.
Tip: You can also set the
parentattribute to aTrackerorObject Detectortracked object, so the clip follows the location and scale of a tracked object. Also see Effect Parent.
Position
The Position property determines the clip’s position on the timeline in seconds, with 0.0 indicating the beginning.
Usage Example: Timing a clip’s appearance to coincide with specific events in the project.
Tip: Adjust the position to synchronize clips with audio cues or visual elements.
Rotation
The Rotation property is a key-frame curve that controls the rotation angle of the clip, ranging from -360 to 360 degrees. You can rotate clockwise or counterclockwise. Quickly adjust the orientation angle of a clip (sideways, upside down, right side up, portrait, landscape), flip a clip, or animate the rotation. See Transform.
Usage Example: Simulating a spinning effect by animating the rotation curve.
Tip: Use this property creatively for effects like rotating text or emulating camera movement.
Tip: In the preview transform tool, hold Ctrl or Shift while rotating to snap to 15-degree increments.
Tip: Experiment with rotating your video at different angles, not just 90 or 180 degrees. Sometimes a slight tilt or a specific angle can add creative flair to your video, especially for artistic or storytelling purposes.
Tip: After rotating your video, you might end up with black bars around the edges. Consider cropping and resizing the video to eliminate these bars and maintain a clean, polished look.
Tip: If you’re dealing with vertical videos that are meant to be watched on horizontal screens, rotate them by 90 degrees and then scale them up to fill the frame. This way, your vertical video will occupy more screen real estate.
Tip: If the horizon in your video appears slanted due to camera tilt, use rotation to level it. This is particularly important for landscape shots to maintain a professional and visually pleasing appearance.
Scale
The Scale property is the initial resizing or scaling method used to display the picture of a clip, which may be further adjusted by the Scale X and Scale Y clip properties (see Scale X and Scale Y). It is recommended to use assets with the same aspect ratio as your project profile, which allows many of these resizing methods to fully scale your clip up to the size of the screen, without adding any black bars on the edges. The scale methods are:
Best Fit (default) – The clip is as large as possible without changing the aspect ratio. This might result in black bars on certain sides of the picture, if the aspect ratio does not exactly match your project size.
Crop – The aspect ratio of the clip is maintained while the clip is enlarged to fill the entire screen, even if that means some of it will be cropped. This prevents black bars around the picture, but if the aspect ratio of the clip does not match the project size, some of the picture will be cropped off.
None – The clip is displayed in its original size. This is not recommended, since the picture will not scale correctly if you change the project profile (or project size).
Stretch – The clip is stretched to fill the entire screen, changing the aspect ratio if necessary.
Scale X and Scale Y
The Scale X and Scale Y properties are key-frame curves that represent horizontal and vertical scaling in percentages, respectively. The range for these curves is 0 to 1. See Transform. OpenShot limits the max scale values based on the file type and the project size, to prevent crashes and performance issues.
Usage Example: Creating a zoom-in effect by animating the Scale X and Scale Y curves simultaneously.
Tip: Scale the image larger than the screen, only revealing a portion of the video. This is a simple way to crop a portion of the video.
Tip: Scale the horizontal and vertical elements separately, to squash and stretch the image in fun ways.
Tip: Combine scaling with rotation and location properties for dynamic transformations.
Shear X and Shear Y
The Shear X and Shear Y properties are key-frame curves that represent X and Y shear angles in degrees, respectively. See Transform. OpenShot limits the max shear values based on the file type and the project size, to prevent crashes and performance issues.
Usage Example: Adding a dynamic tilt effect to a clip by animating the shear angles.
Tip: Use shear properties for creating slanted or skewed animations.
Start
The Start property defines the trimming point at the beginning of the clip in seconds. Changing this property will impact the Duration clip property.
Usage Example: Removing the initial portion of a clip to focus on a specific scene or moment.
Tip: Utilize the “Start” property in combination with the “End” property for precise clip trimming.
Time
The Time property is a key-frame curve that represents frames played over time, affecting the speed and direction of the video. You can use one of the available presets (normal, fast, slow, freeze, freeze & zoom, forward, backward), by right-clicking on a clip and choosing the Speed menu. Many presets are available in this menu for reversing, speeding up, and slowing down a video clip, see Context Menu. The same adjustments can be made interactively with the Timing toolbar button by dragging a clip’s edges; OpenShot adds the necessary time keyframes and scales all other keyframes automatically.
Optionally, you can manually set key-frame values for the Time property. The value represents the
frame number at the position of the key-frame. This can be tricky to determine and might require a calculator to find
the needed values. For example, if the beginning of your Clip sets a time value of 300 (i.e. frame 300),
and the end of your clip sets a time value of 1 (frame 1), OpenShot will play this clip backwards, starting
at frame 300 and ending at frame 1, at the appropriate speed (based on where these key-frames are set on the timeline).
NOTE: To determine the total number of frames in a clip, multiply the duration of the file with the FPS of the project (for
example: 47.0 sec clip duration X 24.0 Project FPS = 1128 total frames).
This allows for some very complex scenarios, such as jump cutting inside a clip, reversing a portion of a clip, slowing down a portion of a clip, freezing on a frame, and much more. See Animation for more details on manual key-frame animations.
Usage Example: Creating a slow-motion or time-lapse effect by modifying the time curve.
Tip: Adjust the “Time” property to control video playback speed for dramatic visual impact.
Volume
The Volume property is a key-frame curve that controls audio volume or level, ranging from 0 (mute) to 1 (full volume). For automatic adjustment of volume, see Volume Mixing.
Usage Example: Gradually fading out background music as dialogue becomes more prominent, or increasing or lowering the volume of a clip.
Tip: Combine multiple volume key-frames for nuanced audio adjustments, such as ducking the level of the music when dialog is spoken.
Tip: For quickly adjusting the volume of a clip you can use the Audio → Volume menu. See Context Menu.
Wave Color
The Wave Color property is a key-frame curve that represents the color of the audio waveform visualization.
Usage Example: Matching the waveform color to the project’s overall visual theme.
Tip: Experiment with different colors to enhance the visual appeal of the waveform or animate the color over time.
Waveform
The Waveform property is a boolean that determines whether a waveform visualization is used instead of the clip’s image.
Usage Example: Displaying an audio waveform in place of the video for visually highlighting audio patterns.
Tip: Use waveform visualization for emphasizing music beats or voice modulations.
Waveform Mode
The Waveform Mode property controls the visualization style used when Waveform is enabled. It uses the same choices as the Visualization property on the Audio Visualization effect: Waveform, Filled Waveform, Bars, Radial, Radial Bars, Spectrum, Phase Scope, Particles, and VU Meter.
Usage Example: Switching an audio-only clip from a standard waveform to bars or a spectrum display.
Tip: Use Wave Color with Waveform Mode to tune both the visualization style and color.
More Information
For more info on key frames and animation, see Animation.