Main Window
OpenShot Video Editor has one main window which contains most of the information, buttons, and menus needed to edit your video project.
Overview
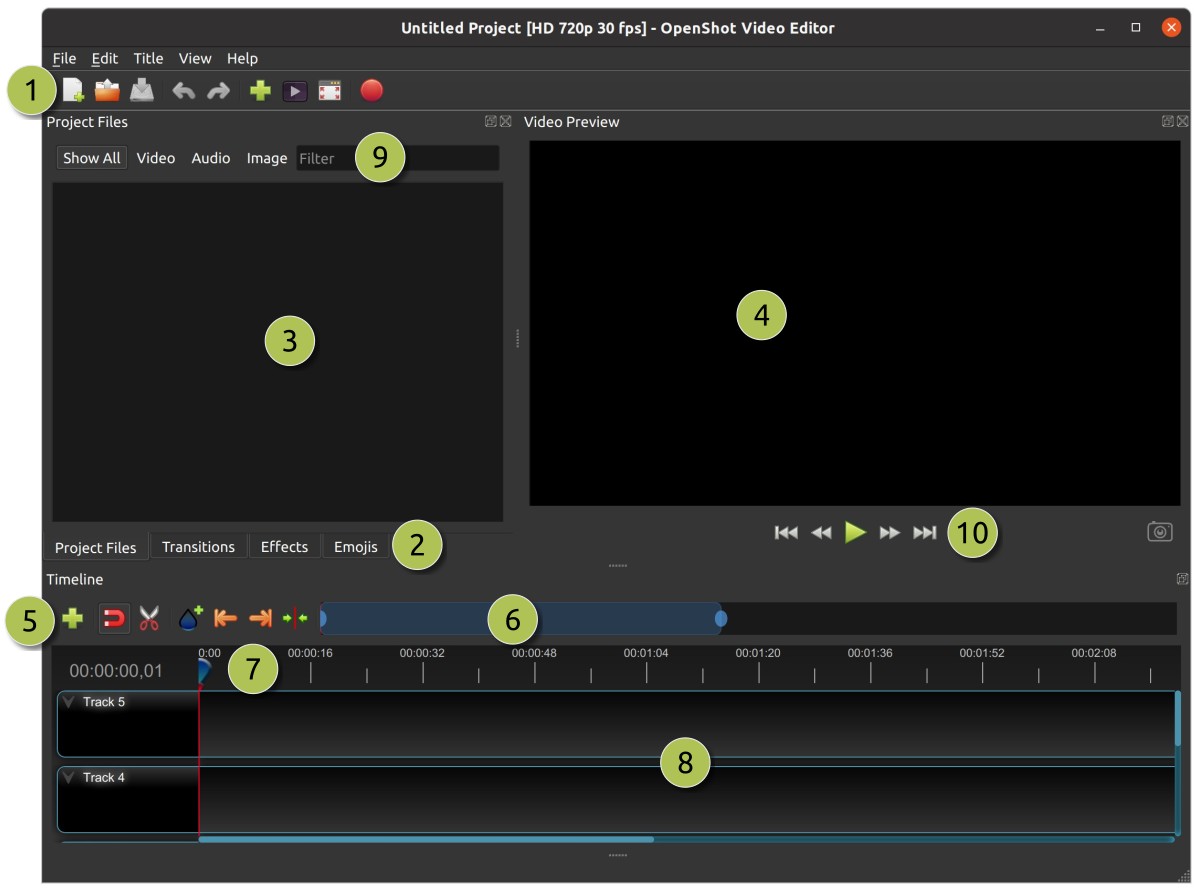
# |
Name |
Description |
|---|---|---|
1 |
Main Toolbar |
Contains buttons to open, save, and export your video project. |
2 |
Function Tabs |
Switch between Project Files, Transitions, Effects, and Emojis. |
3 |
Project Files |
All audio, video, and image files that have been imported into your project. |
4 |
Preview Window |
This is the area that the video will playback on the screen. |
5 |
Timeline Toolbar |
This toolbar contains buttons used for snapping, inserting markers, slicing razor, jumping between markers, and centering the timeline on the playhead. See Timeline Toolbar. |
6 |
Zoom Slider |
This slider will adjust the time-scale of your timeline. Drag the left or right edge to zoom in or out. Drag the blue area to scroll the timeline left or right. Clips and transitions are displayed as simple rectangles, to give you context for adjusting the zoom to specific clips. |
7 |
Play-head / Ruler |
The ruler shows the time-scale, and the line is the play-head. The play-head represents the current playback position. The current timecode can be clicked to enter an exact timecode. Hold Shift key while dragging the playhead to snap to nearby clips. |
8 |
Timeline |
The timeline visualizes your video project, and each clip and transition in your project. You can drag the mouse to select, move, or delete multiple items. |
9 |
Filter |
Filter the list of items shown (project files, transitions, effects, and emojis) by using these buttons and filter textbox. Enter a few letters of what you are looking for, and the results will be shown. |
10 |
Playback |
Left to Right: Jump to Start, Rewind, Play/Pause, Fast Forward, and Jump to End |
11 |
Track |
Track area containing the track name, track menu, and per-track controls such as lock and keyframe panel icons. |
For step-by-step instructions on the basic usage of OpenShot, be sure to read the Quick Tutorial.
Built-in Tutorial
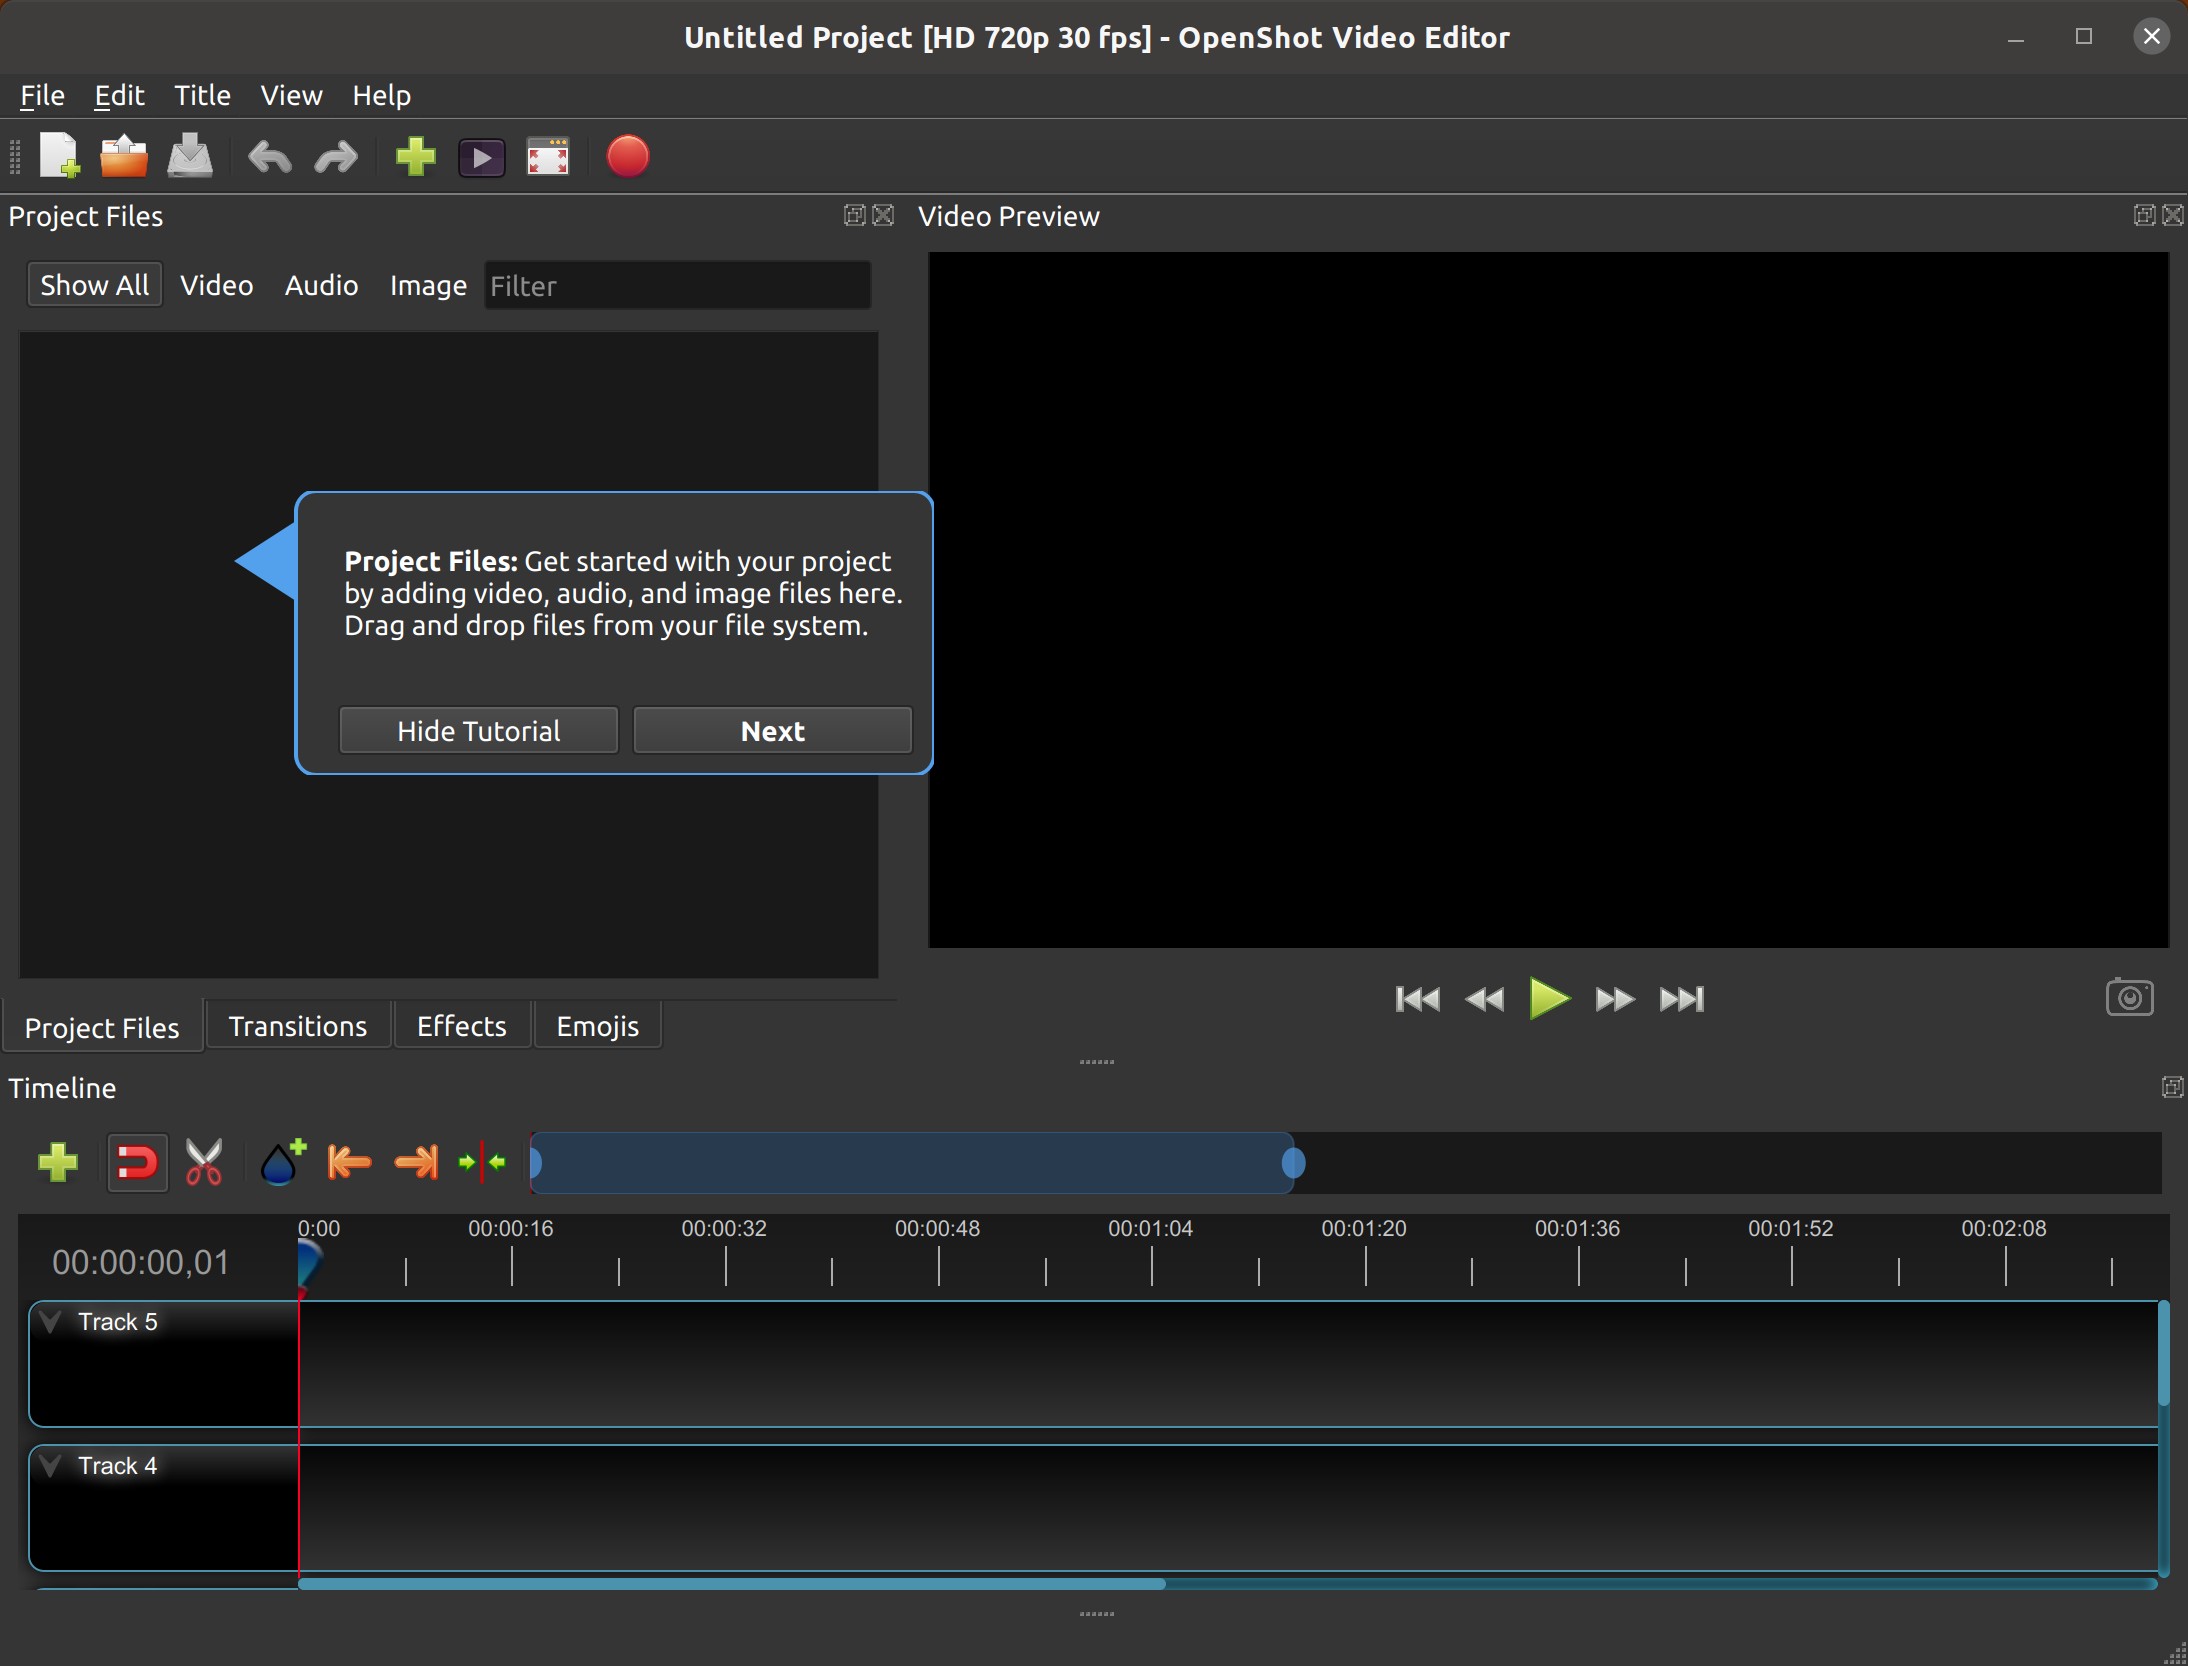
When you first launch OpenShot, you will be presented with a friendly built-in tutorial. It will demonstrate and explain the basics. Clicking Next will jump to the next topic. You can always view this tutorial again from the Help→Tutorial menu.
Tracks & Layers
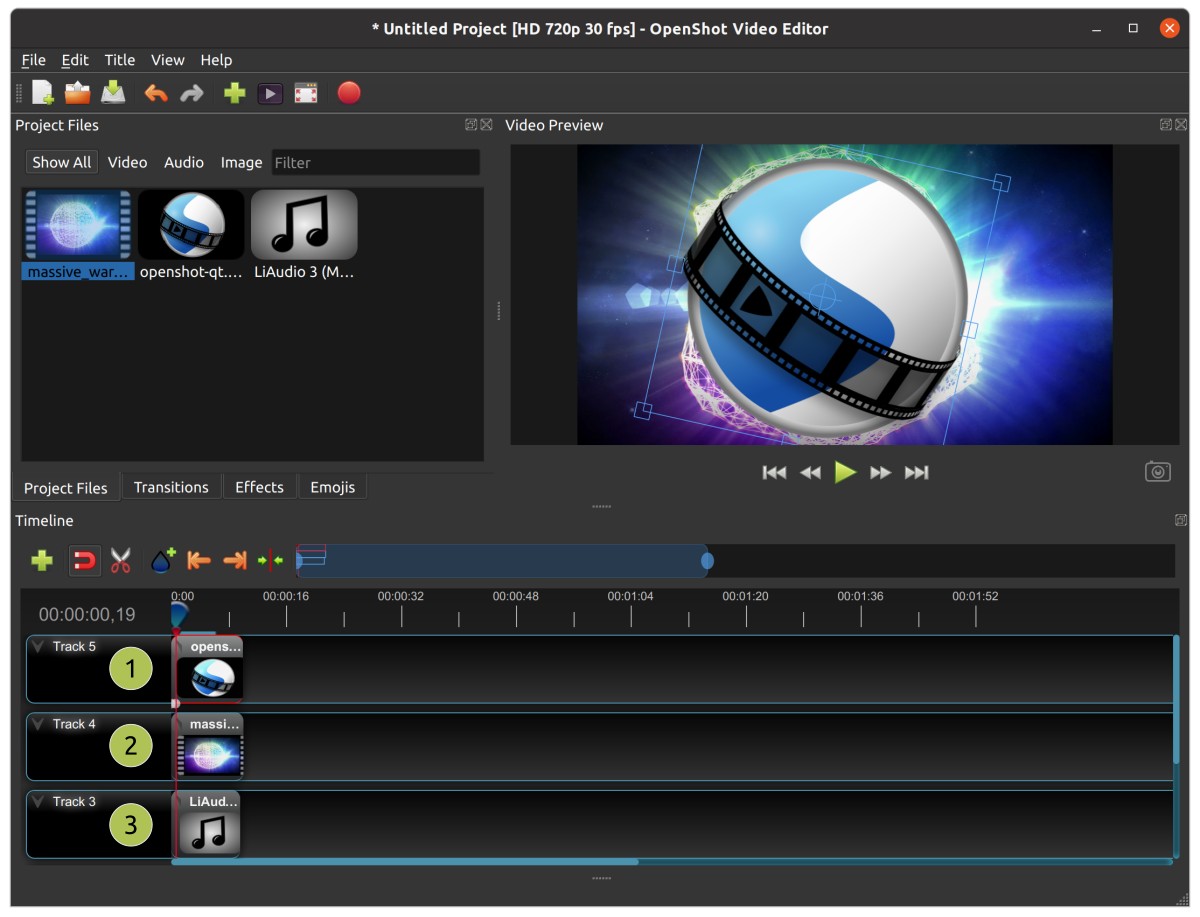
OpenShot uses tracks to layer videos and images. The top most track is the top layer, and the bottom track is the bottom layer. If you are familiar with layers in a photo editing application, then you should be quite familiar with this concept. OpenShot will stack the layers and mix each one together, just like a photo editing application. You can have an unlimited number of tracks, but typically a simple video project will not need more than 5 tracks.
For example, imagine a 3 track video project
# |
Name |
Description |
|---|---|---|
1 |
Top Track |
Clips on this track will always be on top and visible. Often watermarks and titles are placed on higher tracks. |
2 |
Middle Track |
Clips in the middle (might or might not be visible, depending on what is above them) |
3 |
Bottom Track |
Clips on this track will always be on the bottom. Often audio clips are placed on lower tracks. |
Timeline Toolbar
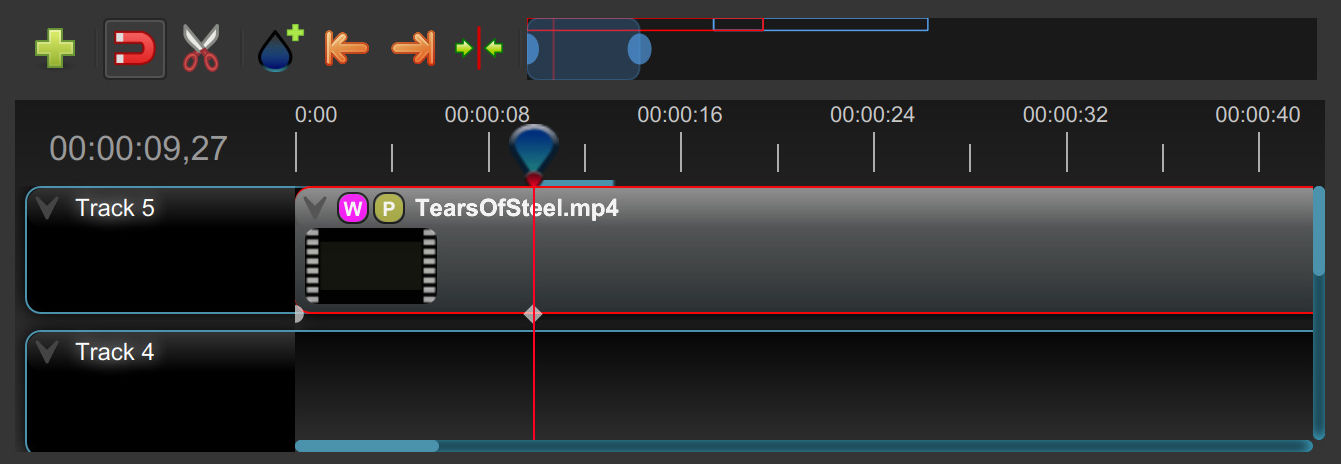
For a beginner-friendly overview of timeline editing (selection, tracks, keyframes, and common workflows), see Timeline.
# |
Control Group |
Description |
|---|---|---|
1 |
Add Track |
Add a new track to the timeline. New projects start with 5 tracks by default. |
2 |
Undo / Redo |
Undo or redo your latest timeline edits. |
3 |
Snap, Retime, Razor |
Snapping toggles magnetic alignment. Timing Tool enables retiming by dragging clip edges. Razor Tool cuts clips at the clicked position. |
4 |
Add Marker, Next/Prev Marker |
Add a marker at the playhead and jump to previous or next marker/clip boundaries. |
5 |
Center on Playhead |
Center the visible timeline area around the current playhead position. |
6 |
Zoom Slider |
Control the visible timeline range. Drag handles to zoom in/out, drag center to pan, and double-click to fit timeline. You can also use Ctrl+Scroll Wheel, or on the QWidget timeline hold Ctrl and drag with the middle mouse button for smooth zooming. |
7 |
Track toggles (Lock, Keyframe Panel) |
Per-track controls such as lock and keyframe panel visibility. |
Keyboard Shortcuts
Here is a list of the default keyboard shortcuts supported by OpenShot. You can configure these shortcuts in the Preferences window, which is opened by selecting Edit→Preferences from the OpenShot menu bar. (On macOS, choose OpenShot Video Editor→Preferences.) Learning a few of these shortcuts can save you a bunch of time!
Action |
Shortcut 1 |
Shortcut 2 |
Shortcut 3 |
|---|---|---|---|
About OpenShot |
Ctrl+H |
||
Add Marker |
M |
||
Add Track |
Ctrl+Y |
||
Add to Timeline |
Ctrl+Alt+A |
||
Animated Title |
Ctrl+Shift+T |
||
Ask a Question… |
F4 |
||
Center on Playhead |
Shift+C |
Alt+Up |
|
Color View |
Alt+Shift+2 |
||
Choose Profile |
Ctrl+Alt+P |
||
Clear All Cache |
Ctrl+Shift+ESC |
||
Clear History |
Ctrl+Shift+H |
||
Delete Optimized Videos |
Ctrl+Shift+O |
||
Clear Waveform Display Data |
Ctrl+Shift+W |
||
Copy |
Ctrl+C |
||
Cut |
Ctrl+X |
||
Delete Item |
Delete |
Backspace |
|
Delete Item (Ripple) |
Shift+Delete |
||
Details View |
Ctrl+Page Up |
||
Donate |
F7 |
||
Duplicate |
Ctrl+Shift+/ |
||
Edit Title |
Alt+T |
||
Export Selected Files |
Ctrl+Shift+E |
||
Export Video / Media |
Ctrl+E |
Ctrl+M |
|
Fast Forward |
L |
||
File Properties |
Alt+I |
Ctrl+Double Click |
|
Fullscreen |
F11 |
||
Import Files… |
Ctrl+I |
||
Insert Keyframe |
Alt+Shift+K |
||
Join our Community… |
F5 |
||
Jump To End |
End |
||
Jump To Start |
Home |
||
Launch Tutorial |
F2 |
||
New Project |
Ctrl+N |
||
Next Frame |
Right |
. |
|
Next Marker |
Shift+M |
Alt+Right |
|
Nudge left (1 Frame) |
Ctrl+Left |
||
Nudge left (5 Frames) |
Shift+Ctrl+Left |
||
Nudge right (1 Frame) |
Ctrl+Right |
||
Nudge right (5 Frames) |
Shift+Ctrl+Right |
||
Open Help Contents |
F1 |
||
Open Project… |
Ctrl+O |
||
Paste |
Ctrl+V |
||
Play/Pause Toggle |
Space |
Up |
Down |
Preferences |
Ctrl+P |
||
Preview File |
Alt+P |
Double Click |
|
Previous Frame |
Left |
, |
|
Previous Marker |
Ctrl+Shift+M |
Alt+Left |
|
Properties |
U |
||
Quit |
Ctrl+Q |
||
Razor Toggle |
C |
B |
R |
Redo |
Ctrl+Shift+Z |
||
Report a Bug… |
F3 |
||
Rewind |
J |
||
Save Current Frame |
Ctrl+Shift+Y |
||
Save Current Frame |
Ctrl+Shift+Y |
||
Save Project |
Ctrl+S |
||
Save Project As… |
Ctrl+Shift+S |
||
Select All |
Ctrl+A |
||
Select Item (Ripple) |
Alt+A |
Alt+Click |
|
Select None |
Ctrl+Shift+A |
||
Simple View |
Alt+Shift+0 |
||
Slice All: Keep Both Sides |
Ctrl+Shift+K |
||
Slice All: Keep Left Side |
Ctrl+Shift+J |
||
Slice All: Keep Right Side |
Ctrl+Shift+L |
||
Slice Selected: Keep Both Sides |
Ctrl+K |
||
Slice Selected: Keep Left Side |
Ctrl+J |
||
Slice Selected: Keep Right Side |
Ctrl+L |
||
Slice Selected: Keep Left (Ripple) |
W |
||
Slice Selected: Keep Right (Ripple) |
Q |
||
Snapping Toggle |
S |
||
Split File |
Alt+S |
Shift+Double Click |
|
Thumbnail View |
Ctrl+Page Down |
||
Timing Toggle |
T |
||
Title |
Ctrl+T |
||
Translate this Application… |
F6 |
||
Undo |
Ctrl+Z |
||
View Toolbar |
Ctrl+Shift+B |
||
Zoom In |
= |
Ctrl+= |
|
Zoom Out |
- |
Ctrl+- |
|
Zoom to Timeline |
\ |
Shift+\ |
Double Click |
About OpenShot
Use Help→About OpenShot to check your OpenShot version. Click Copy next to the version number to copy a short version and system details report, which is the preferred way to share this information when reporting a bug or asking for help.
Example output:
**OpenShot Version Info**
Version: 3.5.1-dev | libopenshot: 0.7.0
OS: Ubuntu 24.04
CPU: AMD Ryzen 7 8840HS w/ Radeon 780M Graphics (16 threads) | RAM: 15 GB
Cache: Memory, 900 MB, 905 frames, ahead 50%, pre-roll 24/48
Performance: Threads: OMP 16 | FFmpeg 16, Cards: Decode: None (0) | Encode: 0
Views
The OpenShot main window is composed of multiple docks. These docks are arranged and snapped together into a grouping that we call a View. OpenShot includes Simple View, Color View, and My Views (user-defined layouts).
Simple View
This is the default view, and is designed to be easy-to-use, especially for first-time users. It contains Project Files on the top left, Preview Window on the top right, and Timeline on the bottom. If you accidentally close or move a dock, you can quickly reset all the docks back to their default location using the View->Simple View menu at the top of the screen.
Color View
This view is focused on color correction and scopes. It enlarges the video preview, hides file-management docks, keeps the timeline and properties visible, places the Color Wheels dock on the right, and tabifies the Luma Waveform and Histogram docks together below it.
Recording View
This view is focused on creating new recordings inside OpenShot. It shows Project Files, Video Preview, Timeline, and the Recording dock. The Properties dock is grouped with Project Files as a tab, so you can show it from View->Docks->Properties without disrupting the recording layout.
The Recording dock can record microphone audio, screen capture, webcam video, or combinations of those sources. When screen and webcam are recorded together, OpenShot can place the webcam as a corner picture-in-picture clip. Those corner camera clips use normal clip properties after they are added to the timeline: Gravity chooses the corner, Scale X and Scale Y set the corner size, Margin creates the inset layout area that keeps the camera away from the screen edge, and Corner Radius rounds the camera clip without adding a separate Mask effect. See Clip Properties for details. See Recording for the complete recording workflow and all source options.
My Views
My Views lets you save any dock arrangement as a named layout and recall it instantly. This is ideal for workflows that require switching between different editing modes — for example, a detailed audio mix layout and a focused color grading layout — without manually repositioning docks each time.
Each saved view captures the position, size, and visibility of every dock, as well as the timeline height. Saved views are stored in your project settings and persist across sessions.
View → My Views menu options:
Menu Item |
Description |
|---|---|
List of user-defined views |
Click to restore that layout. The currently active view shows a checkmark. |
Update “[name]” |
Save your current dock arrangement over the active view, replacing it. |
Delete “[name]” |
Remove the active view (asks for confirmation first). |
Save Current View As… |
Name and save your current dock arrangement as a new view. |
Typical workflow:
Arrange your docks exactly how you like them.
Open View → My Views → Save Current View As… and enter a name (e.g. “Audio Mix”).
Later, open View → My Views and click the view name to restore that layout instantly.
If you adjust the layout and want to keep the changes, choose Update “Audio Mix” to overwrite it.
Docks
Each widget on the OpenShot main window is contained in a dock. These docks can be dragged and snapped around the main window, and even grouped together (into tabs). OpenShot will always save your main window dock layout when you exit the program. Re-launching OpenShot will restore your custom dock layout automatically. Scope docks are grouped under View->Scopes.
Dock Name |
Description |
|---|---|
Captions |
Manage and add captions or subtitles to your video project. Allows you to create, edit, and manage caption data. See Caption effect. |
Effects |
Browse and apply video and audio effects to your video clips. Includes filters, color adjustments, and special effects. See Effects. |
Color Wheels |
Edit Color Grade wheel controls for global, shadows, midtones, and highlights from a dedicated right-side dock. |
Emojis |
Add emoji graphics to your video project. Choose from a variety of emojis to enhance your video content. |
Histogram |
Analyze the tonal and channel distribution of the current preview frame. |
Luma Waveform |
Analyze brightness distribution across the current preview frame. |
Audio Levels |
Monitor audio level scope data for the current preview frame. |
Project Files |
View and manage all the media files imported into your project. Organize, filter, and tag video, audio, and image files. See Files. |
Properties |
View and edit the properties of a selected effect, transition, or clip. Adjust settings such as duration, size, position, etc… See Clip Properties. |
Recording |
Record microphone audio, screen video, webcam video, or combined recordings. See Recording. |
Transitions |
Browse and apply transitions between video clips. Choose from a variety of transition wipes to create smooth changes between scenes. See Transitions. |
Video Preview |
Preview the current state of your video project. Allows you to play back and review your edits in real-time. See Playback. |
If you have accidentally closed or moved a dock and can no longer find it, there are a couple easy solutions. First, you can use the View->Simple View menu option at the top of the screen, to restore the view back to its default. Or you can use the View->Docks->… menu to show or hide specific dock widgets on the main window.